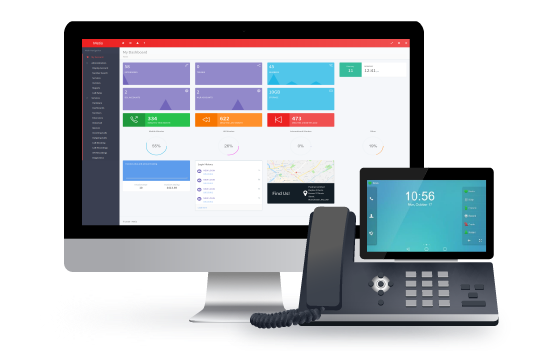
We’re happy to announce the arrival of our integrated provisioning platform. You can find it in the new ‘Hardware’ section of your Metis account.
Provisioning lets you add MAC addresses and gives you the tools to remotely manage their settings and values. You can also create customer templates for phone models that share a group of settings.
The platform currently supports most Snom and Yealink IP phone ranges (full list) with an aim to expand our supported manufacturers in the future.
You can download our Guide to Provisioning here, or skip to the Packnet’s Provisioning Platform section below to read about the features.
Contents
What is provisioning?
How does this benefit me and my customers?
Packnet’s Provisioning Platform
What is provisioning?
IP phone provisioning is a means of creating and storing configuration files on a remote server which the phone connects to during its startup process.
The phone will request a configuration file from the server which usually contains authentication credentials and any other settings your provider requires to connect to their service.
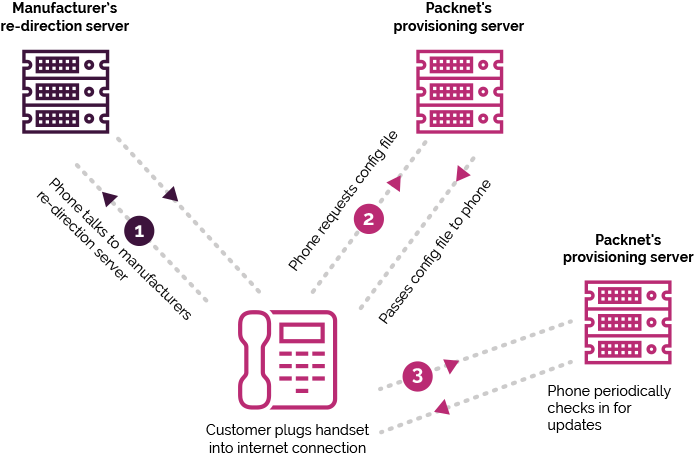
The phone downloads and applies the configuration file to itself and then finishes its startup process. Assuming the configuration file is valid, you will be left with a fully configured phone which is ready to make calls.
How does this benefit me and my customers?
Provisioning benefits service providers and end users equally.
In the past, service providers had no choice but to order a customer’s phones to their own office first. From there, the service provider would manually configure the IP phones, using the web interface, before shipping the phones to their customer. This method is time-consuming and subject to a higher level of human error.
Example 1: Order turnaround without provisioning
- Customer places IP phone order and requests configuration
- Order phones from supplier to ship to your own office (+1 day)
- Unbox and configure the phones manually, one-by-one (+1 day)
- Re-box all the handsets
- Ship phones to the customer (+1 day)
Total lead time: At least 3 working days
Pros: Customer receives pre-configured phone
Cons: Double handling, time-consuming, tedious, phones cannot be managed remotely after customer deployment
By using provisioning, you can configure your customer’s phones from one central location and without opening a single box.
This dramatically reduces order turnaround times, and thanks to intuitive interface design, reduces human error.
Example 2: Order turnaround with provisioning
- Customer places IP phone order and requests configuration
- Order phones from supplier to ship directly to the customer
- The supplier sends you MAC addresses
- You add MAC addresses to Provisioning and apply the configuration
- Phones arrive at customer premises and download their config during startup
Total lead time: 1 working day
Pros: Customer receives pre-configured phone the day after placing their order, no double handling fees, remote management of phones after customer deployment
Cons: None
Packnet’s Provisioning Platform
“Hardware” features
Access to Packnet Provisioning is via the Hardware section of your Metis account. From there you can provision new phones, create new templates and manage whatever is already there.
There are two main sections: Provisioning and Templates. We will start with Provisioning:
Provisioning
Add new phone
The Add New Phone panel lets you add a new MAC address, specify the model and assign an extension in one go.
- Select your model
- Select your extension
- Enter MAC address in MAC Address field
- Click “Add Phone”

After adding your MAC address, it is presented in the “Phones” panel underneath. From there you can start to manage additional settings, the phone’s firmware and generate new web interface passwords.
Managing existing phones
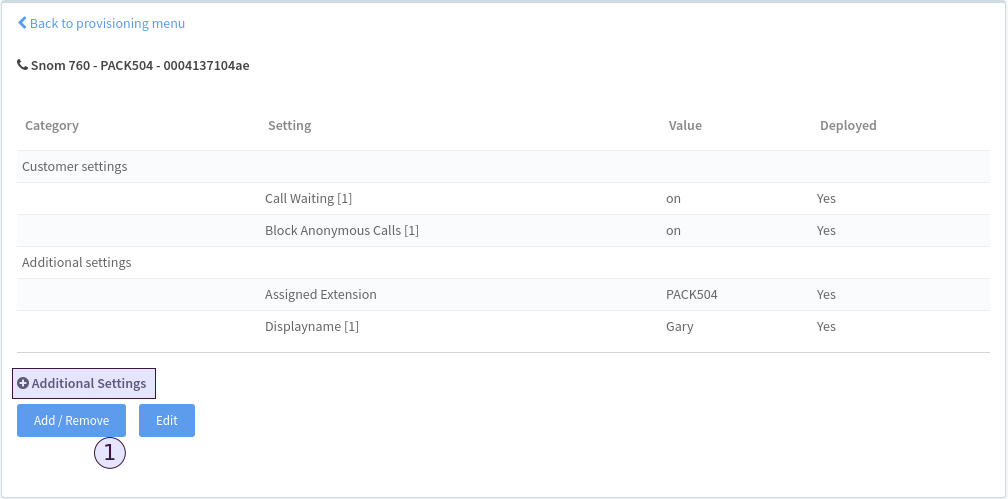
Viewing a MAC’s settings
To view an existing phone’s settings, click “View” next to the relevant MAC address in the “Phones” panel.

Metis will take you to that MAC’s individual settings page where you can view all the settings associated to that MAC address.
Add/remove additional settings
To add additional settings to your MAC address, you must first select them by clicking “Add / Remove”.
Highlight your required settings (ctrl+click to multi-select) and click “Save Changes”.
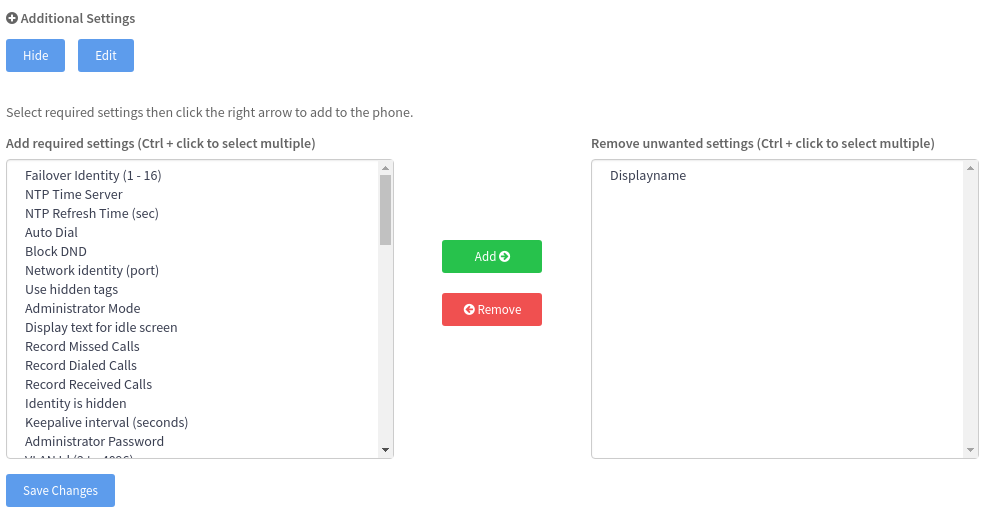
If you are removing settings, highlight unwanted settings in the right-hand table and click “Save Changes”. If you add any additional settings, Metis will progress you onto the “Edit phone-specific settings” page where you can assign your values.
Updating a MAC’s settings
From the MAC’s individual settings page, you can update the values associated with settings by clicking “Edit”.
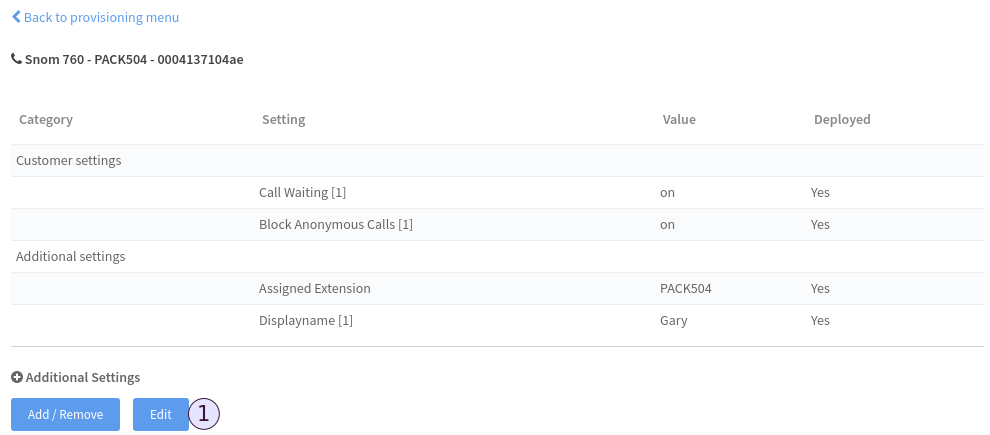
From here you can also change the extension. You must click “Save and Deploy” to apply your settings.

Changing a MAC’s firmware
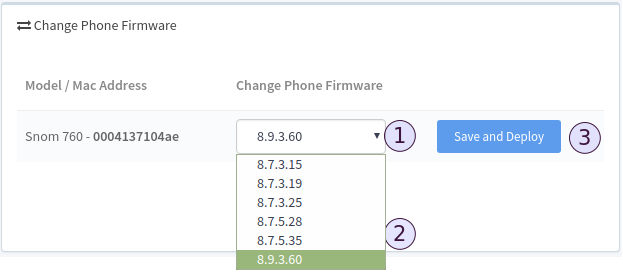
Using the “Change Phone Firmware” panel, select your firmware from the drop-down list of available firmware and click “Save and Deploy”. Follow the prompts to apply the change.
Changing a MAC’s web interface password
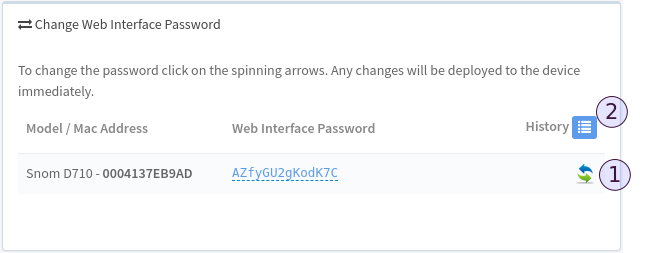
You can view and generate a new web interface password in the “Change Web Interface Password” panel. Click the arrows to generate a new one. They will always be randomly generated. You can view the web interface password history for the MAC by clicking the History icon.
Removing a MAC address from Hardware
You can remove a MAC address by clicking the red X icon. !This will also delete the configuration file for the MAC on the server!

Templates
Templates are used when a single account requires the same settings and values to be deployed across an entire phone model group (e.g. Snom D710 or Yealink T41S).
Templates are associated with specific phone models. If you create a template for a Snom D710 then any Snom D710 MAC address you add will automatically take the template’s settings and values.
With templates, you can:
- Create a template for any available phone model
- Create more than one template for any available phone model
- NB: You can only have one Live template per phone model, the rest will be marked “Inactive”
- Update your template’s settings
- Update your template’s setting values
- Delete your template
Creating a new template
To create a new template you must first specify the:
- Template name
- Template manufacturer
- Template model
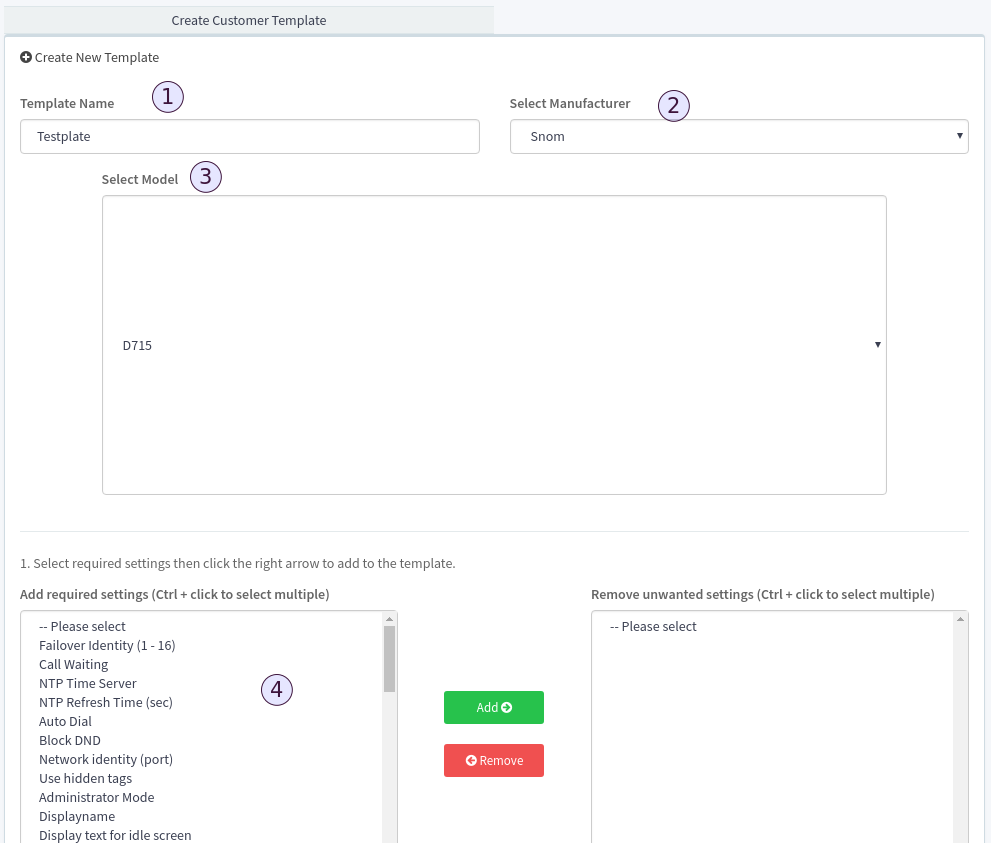
Once you have associated a manufacturer and model, the “Add Required Settings” table will generate available settings to choose from.
Adding required settings
Use this panel (number 4 in the diagram above) to identify your template’s required settings. Select your settings (ctrl+click to multi-select) and click “Add” to move them over to your template.
Making your template “Live”
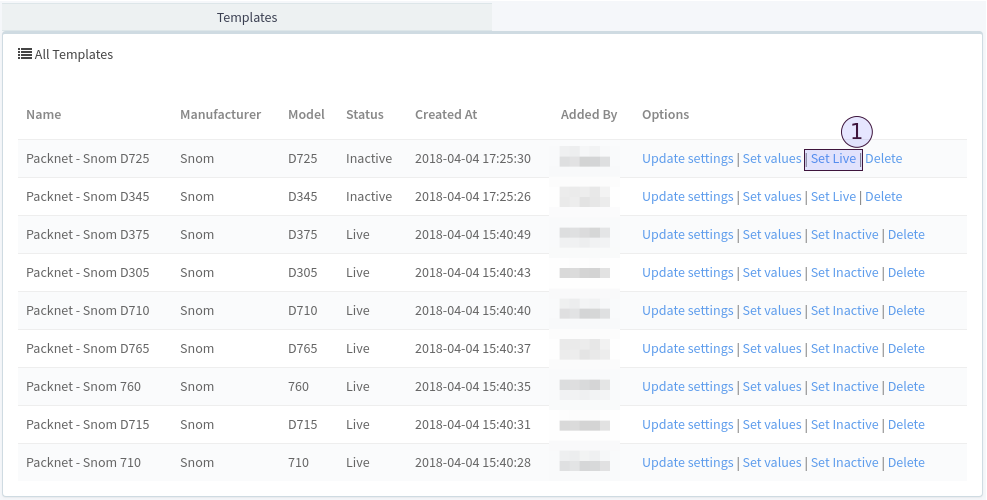
After you have successfully created a template and assigned your values, you must then set its status to Live by clicking “Set Live”.
Managing existing templates
Updating settings
You can update the settings for any of your templates by clicking “Update settings”.
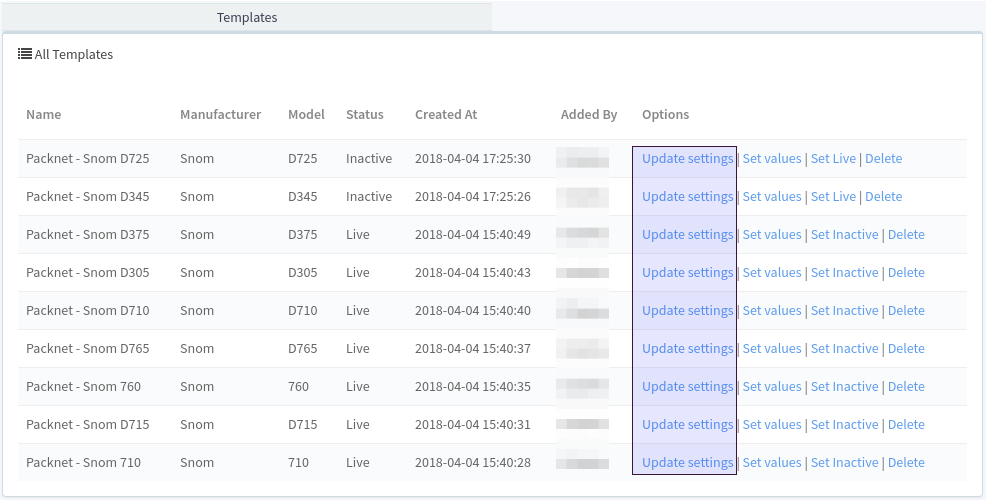
The page will update to show was is currently saved and you can use the “Add”/“Remove” buttons to update your required settings. Click “Save Changes” to apply.
Updating values
You can update your setting values for any of your templates by clicking “Set values”.
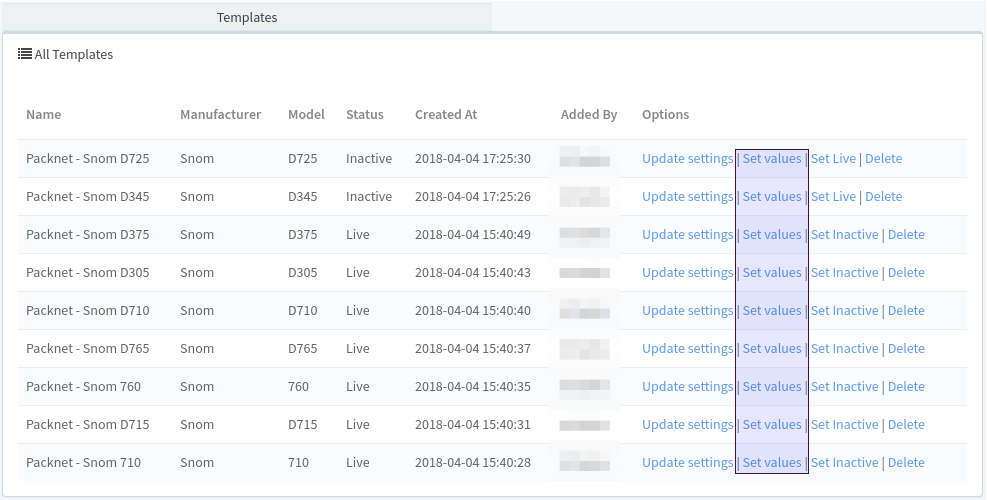
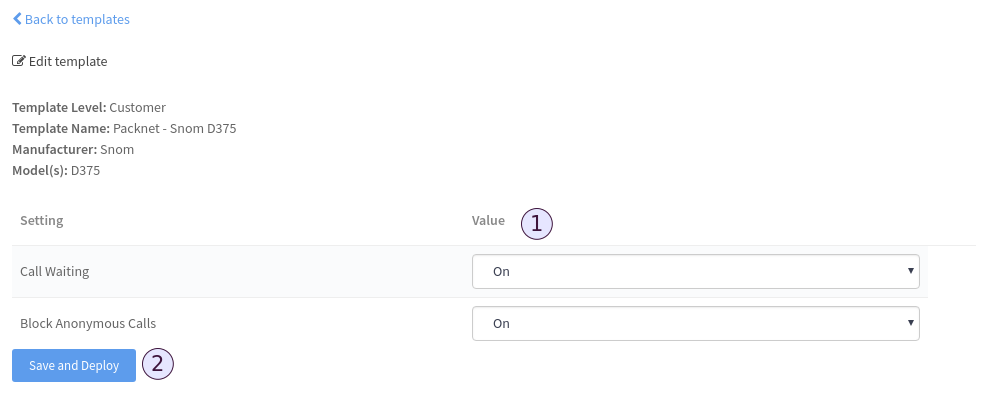
Enter the values in the relevant fields and click “Save and Deploy” to apply your changes.
Toggling a template live/inactive
There are two statuses for a template: 1. Live, 2. Inactive. Toggling a template from “Live” to “Inactive” causes Metis to update the phone’s configuration file and remove any settings associated to your template.
Deleting a template
You can delete a template by clicking “Delete”. This will cause Metis to update the phone’s configuration file and remove any settings associated with your template.
Supported models
Yealink
| Series | Model |
| T1 Series | T19 E2 |
| T2 Series | T21P E2 |
| T23G | |
| T27G | |
| T4 Series | T40G |
| T40P | |
| T41P | |
| T42G | |
| T46G | |
| T48G | |
| T4S Series | T41S |
| T42S | |
| T46S | |
| T48S |
snom
| Series | Model |
| 3 Series | 300 |
| 320 | |
| 7 Series | 710 |
| 720 | |
| 760 | |
| 8 Series | 821 |
| D3 Series | D305 |
| D315 | |
| D345 | |
| D375 | |
| D7 Series | D710 |
| D712 | |
| D715 | |
| D725 | |
| D765 |
